This document is provided as is without any express or implied warranties. While every effort has been taken to ensure the accuracy of the information contained, the author assumes no responsibility for errors or omissions, or for damages resulting from the use of the information contained herein.
Permission is granted to make and distribute verbatim copies of this document for non-commercial private research purposes provided the copyright notice and this permission notice are preserved on all copies. Website mirroring is permitted by express prior arrangement. Permission will only be granted if the document is posted in its entirety and the content and format of the document remain completely unaltered by the mirroring site. The definitive version of this document can be found at http://www.shelaghlewins.com.
Copyright © 2004 Shelagh Lewins.
In addition to there being many nalbinding stitches, there are also several ways in which you can construct socks. This article assumes that you know at least one nalbinding stitch already, and can increase and decrease. Several of the methods only require you to work in the round, but two of them require you to be able to work rows backward and forward, and to cast on to create a row sticking out from the main work.
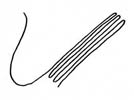
This method allows you to carry more thread on the needle, so you don't have to join new lengths of wool on so often. Fold the wool two or three times, leaving a long end which you will attach to the old piece. Then pull about half of the folded section through the needle. When you need more thread, you can pull one of the folded loops back through the eye of the needle.
Figure 1: holding a long piece of wool on the needle
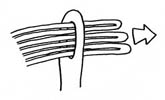
When starting the toe of a sock, or any other spiral-structured piece, make a large starting loop onto which to sew your first circle of stitches, and then pull it tight by pulling on the free end, and start working in a spiral. Figure 2 shows a slip-knot used as a starting loop, with mesh stitch worked into it. Figure 3 shows a simple loop, with nalbinding type 1 (Hald's notation) worked into it. Use whichever combination works best for you.
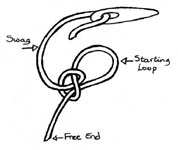
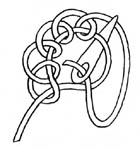
Figure 2: working mesh stitch (Hald's notation) around a slip-knot starting loop
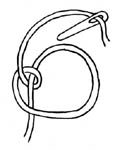

Figure 3: working stitch type I (Hald's notation) around a simple starting loop
All of the sock construction methods in this article start with a toe. Make a starting loop, and work outwards in a spiral, increasing in length and width until it covers your foot to the arch, as shown in Figure 4. Then you make the heel according to your chosen method.
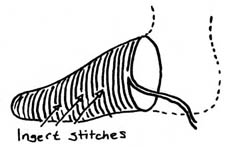
Figure 4: the standard toe
I find it really helpful to make two socks at once, by working a few rows on each alternately. That way, I don't end up with one completed sock, trying to remember how I made it so I can make the other to match. My socks may not fit me, but they are pairs and hence will fit somebody!
Coppergate stitch twists, so you may want to use a different stitch when making a "ladder" or row of stitches going away from the work (for example if making Heel Type C). Oslo stitch, classified by Hald as IIA, is fairly simple to make and works well. You can also use this to make a starting row for any item when you don't want to begin at the centre of a cup. For example, cast on a few inches to make the base of a square pouch, or cast on a row which will go around your leg to make a stocking. Of course you can use it for a whole item if you like, though I don't know whether it has been authenticated for the Viking period. Note that modern Norwegians make this stitch on the thumb so that it is very loose, which is great for socks, but for pouches I would make the stitch fairly tight to give a firm fabric. There are other websites which give more detailed instructions for the thumb method, so rather than reproducing their work, I suggest you search for "Oslo stitch".

Figure 5: casting on in Oslo stitch
Joining new pieces in works best with pure wool. Leave an inch or two of the old piece of yarn hanging out, and tease it apart with your needle into separate fibres. Do the same with the first inch or so of your new piece. I give the new piece a bit of a twist so that it's more tightly twisted than it is naturally, in order to help keep everything together later. Then lay the two frayed ends together, interleaving the fibres as much as possible. Now wet the area of the join, and rub it firmly to and fro on the palm of your hand with the fingers of the opposite hand - the idea is to felt the fibres together slightly. After that, give the thread at the join a few twists to help it hold together, and carefully start sewing again, making sure you don't pull hard on the join. It should only take 1 or 2 stitches for the join to disappear into the work, and then you can carry on as usual. If it goes wrong i.e. the new piece comes off, just try the whole thing agan, undoing a stitch or two if necessary.
The labels I've given the heel types are completely arbitrary, by the way. This one is a good beginner's heel, as you only need to be able to work spirals, and join two pieces together. I have found it tricky to get the length right though. Make a standard toe. Then make another cup-shaped piece which fits over your heel, and sew the two together, along about half the circumference of the heel piece.
The method is known from Medieval Uppsala [1].
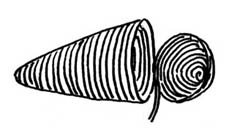
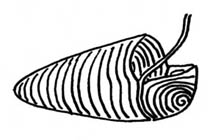
Figure 5: make a foot and attach a cup-shaped heel
In the following methods, instead of working backwards and forwards, you can work short rows. Break the wool off at the end of the row and sew the end in. This is easier to do but sewing in all the ends is a bit fiddly.
I'm not sure I can describe this in words...that's what the pictures are for. It's a slightly finicky technique since you have to be able to work decreasing rows to and fro, but it makes a good, comfy heel. Make a standard toe and then start working partial rows to and fro, the first one being about half the distance around the opening of the work. Work decreasing rows until the total length of the work equals the length of your foot. Then work increasing rows at right angles, linking to the ends of the previous short rows
As far as I can tell from the published material, this is possibly the method of construction of the Coppergate Sock [1]. Hald would have categorised the stitch as Type II [2].
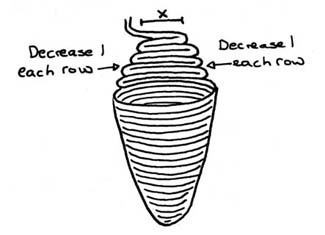

Figure 6: work decreasing rows, then increasing rows which link to them
Sandra Geurts described this construction method to me. It's based it on her observations of the Jorvik sock. I haven't tried it yet, but it's very clever and she claims it's very easy to get the sock to fit. You need to be able to cast on, and to work increasing rows to and fro.
Make a standard toe, and then cast on a row or "ladder" going straight out from the work. Make this long enough to go around your heel and meet the toe section on the other side, attaching it to the opposite side as shown in Figure 7. Then start working in the corner, working left and right rather than in a circle, and increasing a stitch at each end of each row. Once you reach the middle of the "ladder", stop. Start again in the other corner, and work out to the middle of the "ladder" again. Then start working in a circle to fill in the cup of the heel. After the first round, decrease, initially fairly slowly and then rapidly as you reach the middle of the cup. Keep trying the sock on as you make it and you should be able to work it to fit.
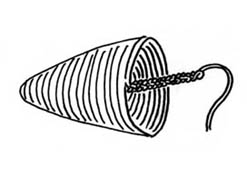
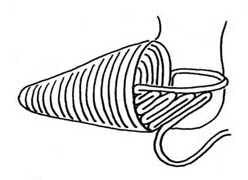
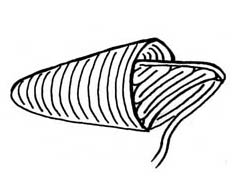
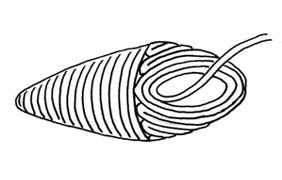
Figure 7: Construct a ladder running around the heel, and fill in the heel

Figure 8: the ladder may alternatively be attached at the top of the foot
You may alternatively attach the "ladder" at the top of the foot, but you should still make it the same length, or you will have difficulty getting the sock on and off.
Instead of working to and fro, you can make the heel in rounds. Break off the thread once you have attached the ladder and sew in the end. Restart on the inside of the hole where the heel is to be, and work rounds within the opening, reducing 3-5 stitches at the corners (the number will depend on your stitch and wool). When the hole is quite small, perhaps an inch and a half across, reduce by one stitch, every other stitch, until the hole is small enough to sew closed.
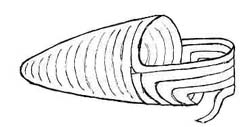
Figure 9: working rounds
This method is my guess at the construction of a Roman child's sock on display in the Ashmolean Museum, Oxford. The sock looks more like a bootee from Mothercare than any archeological find, and the toe is made in broad stripes of orange, green and purple. The stitch looked like mesh stitch to me, i.e. it resembles stocking-stitch knitting in appearance, but it is presumably nalbinding since the sock dates from around the 4th century AD. A sock with similar construction but a divided toe is known from 4th-6th century Egypt [1].
Work a standard toe, and then work to and fro to make a piece which fits underneath your heel. Then work rows to and fro going up the sides and back of the heel, linking to the edge of the toe piece at each end. At the top, you can either start working in the round, or as on the Roman sock, you can work a few more rows to and fro to leave an opening at the front.
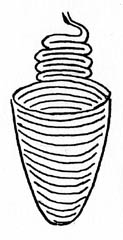
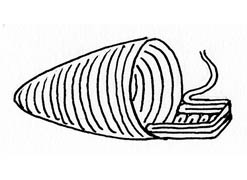
Figure 10: make a base for the heel and work to and fro up the heel
I learned this method from a Norwegian re-enactor, and believe it to be a traditional Scandinavian method. She used Oslo stitch, but any stitch would probably do. It is a terribly clever method, because you don't have to attach any pieces on, or ever work backwards and forwards, but you do have to be able to cast on. My first attempts came out looking very mis-shapen, because it's not easy to tell just how much you need to decrease to keep the sole of the sock flat.
It differs from the other methods in that you don't make a standard toe going right up to the arch of your foot. Instead, make just a small toe only about 2 inches long (depending on your foot). Then make a ladder going straight out to within about an inch of the end of your heel.
Then work down one side of the ladder and begin going round the entire open edge of the work in a deformed spiral. Decrease several stitches each time you go along the base of the ladder, and increase around the end of the ladder to keep the sole flat. Oh, just look at the pictures ;)
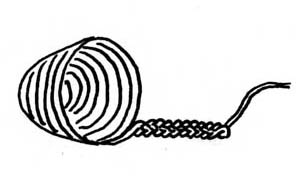
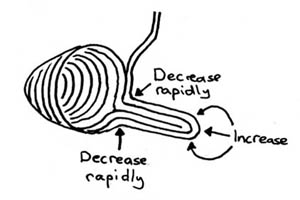
Figure 11: Norwegian all-in-one method
Once the sole is just a little smaller than your foot, stop increasing at the heel, but continue to decrease at the ladder base in order to bring the sock in around your ankle.
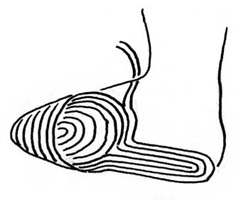
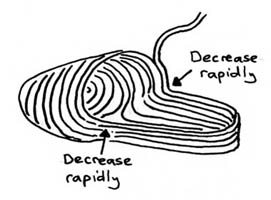
Figure 12: Norwegian all-in-one method
Whichever method you choose to make the heel, you have a couple of choices about the ankle. Either go round and round, decreasing at the sides of the ankle, or go to and fro to make the sides and back.
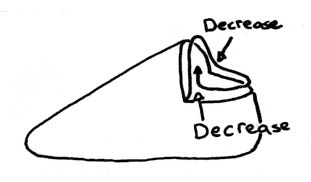
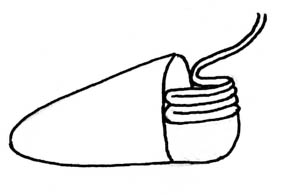
Figure 13: two ways to make ankles
If working to and fro, you can leave a slit at the top.
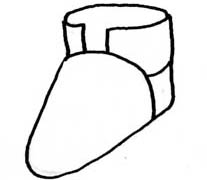
Figure 13: leave a slit at the front
Note that early socks were generally shoe-liners or very short ankle socks, and could be worn with a separate stocking to keep the leg warm. I've found that if you make a nalbinding sock which goes up the leg, it may be difficult to get on and off unless you make the ankle quite loose - you can always tie it close around your ankle with a piece of braid or ribbon.