
Using the original method developed by Freyja Eriksdottir
This document is provided as is without any express or implied warranties. While every effort has been taken to ensure the accuracy of the information contained, the author assumes no responsibility for errors or omissions, or for damages resulting from the use of the information contained herein.
Permission is granted to make and distribute verbatim copies of this document for non-commercial private research purposes provided the copyright notice and this permission notice are preserved on all copies. Website mirroring is permitted by express prior arrangement. Permission will only be granted if the document is posted in its entirety and the content and format of the document remain completely unaltered by the mirroring site. The definitive version of this document can be found at http://www.shelaghlewins.com.
Illustrations: Shelagh Lewins, based on those in Margrethe Hald's book.
Copyright © 2006 Shelagh Lewins.
The pattern needs to be made to fit the individual: it's recommended that you make up a trial pair in cheap fabric such as an old sheet, cutting all the pieces oversized to allow for adjustment. Initially, pin or sew them loosely so that you can easily make alterations. These may then be dismantled and used as a guide for making a good pair.
The Thorsbjerg trousers are cut to fit very tightly at the leg and most people need to make the leg wider than on the originals.
The waistband is designed to be folded over: if you don't want to do this, you may wish to make the trousers shorter in the body. The original waistband is also only a single thickness, which makes it tricky to hide the raw edges. You may wish to cut a double-thickness waistband, folded along the long straight edge. Sew the waistband to the trousers along one edge, then fold it over, turn the raw edge under and hem it.
The belt loops were not finished off in any way. You can make them larger and fold them so that the raw edges are hidden. Sew these up, then attach to waistband.
The original trousers had feet on the legs, like a romper suit. These have been left off in this explanation.
Get somebody else to measure you. Put on a pair of trousers that fit you comfortably and that come as far up your body as you want your new trousers to reach - this gives you a visual guide to where to make the crotch measurements, and ensures that your trousers will have enough room for ease of fit. It also makes the measuring process slightly less intimate for your assistant!
Use a tape measure to take the following measurements, and record the values. Double-check all these measurements against your existing trousers, which will provide a pretty good guide.
Figure 1: taking your measurements
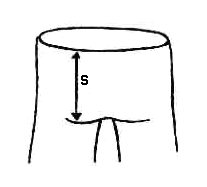
Figure 2: seat height
| Name | Description | Method | Value |
|---|---|---|---|
| WA | Waist To Ankle Height | Measure the vertical distance from the top of your trousers to the bottom edge of the trouser leg. Measure at the side of your body. | |
| TA | Thigh To Ankle Height | Measure the vertical distance from the top of your thigh to the bottom edge of the trouser leg. The top of the thigh is level with the bottom of the crotch. | |
| KA | Knee To Ankle Height | Measure the vertical distance from the back of your knee to the bottom edge of the trouser leg. | |
| A | Ankle Width | Measure loosely around your ankle, and make sure that you'll be able to pass your foot through this measurement. | |
| K | Knee Width | Measure loosely around your knee: you need to be able to bend your knee with the trousers on. | |
| T | Thigh Width | Measure loosely around the top of your thigh. | |
| H | Hip Width | Measure around the widest part of your hips. | |
| C | Crotch Distance | Measure the distance from the front top of your trousers to the back top, passing between your legs. Ensure that your measurement allows a bit of room in the critical area. | |
| S | Seat Length | Measure from the top of the waistband at the back, down to the lower edge of the buttock. On most jeans, this is around the lower edge of the back pocket. |
Brown wrapping paper is ideal for making patterns: you'll need to tape several pieces together to make a sufficiently wide piece. Newspaper can also be used but it tears easily and the ink may mark your cloth.
These lines are taken directly from your measurements and will be the foundation of your pattern. They are the solid lines on the diagrams.
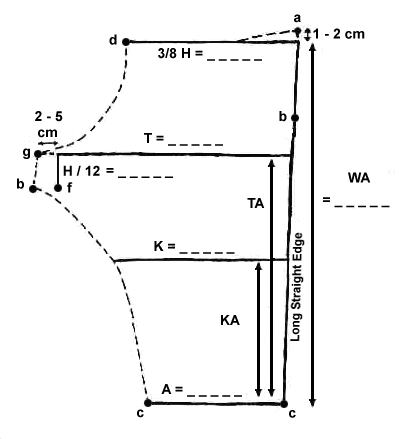

Figure 3: draw the leg pattern
Draw a vertical line of length WA cm at the right-hand side of the paper.
Draw a straight line at a slight angle from the vertical, running from the top of your first line to a point level with the bottom but slightly to the left of it. This is the Long Straight Edge of the leg piece. The angle may need to be slightly greater on a woman than a man, to allow for the hips.
Going leftwards from the top of the Long Straight Edge, draw a horizontal line of length 3 X H / 8.
3 X H / 8 = .........
Going leftwards from the bottom of the Long Straight Edge, draw a horizontal line of length A. This is the Ankle Line.
Measure a vertical distance KA up from the Ankle Line. At this height, and starting from the Long Straight Edge, draw a horizontal line of length K. This is the Knee Line.
Measure a vertical distance TA up from the Ankle Line. At this height, and starting from the Long Straight Edge, draw a horizontal line of length T. This is the Thigh Line.
Draw a vertical line of length H / 12 going downwards from the left-hand end of the Thigh Line.
H / 12 = .........
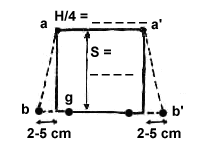
Figure 4: seat panel
Draw a rectangle:
Height: S
Width: H / 4 = .........
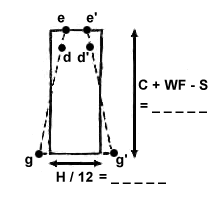
Figure 5: front piece
Draw a rectangle:
Height: C + WF - S = .........
Width: H / 12 = .........
WF is the desired width of the waistband at the front. A value of 5 cm is suggested.

Figure 6: waistband.gif
Draw a horizontal line of length H. Draw two vertical sides of length WF downwards from the ends of the first line. In the middle of the first line, draw a vertical line of length WB. Draw the lower edge of the waistband as a slight curve, joining the bottom ends of the three vertical lines.
WB is the desired width of the waistband at the back. A value of 6 cm is suggested.
Drawing the final lines of the pattern involves adjusting various lines so that the pieces will fit together correctly. The adjustment lines are the dashed lines on the diagrams.
Extend the base of the Seat Panel 2.5 cm on each side, and draw in new, angled sides to the patch. These extensions should be altered during the fitting process, and can be expected to be 2 to 5 cm in the final version.
Measure the length of the angled side of the Seat Piece, ab.
Extend the top of the Long Straight Edge by 1.5 cm. Draw an angled line to connect the top of the Long Straight Edge to the previous top of the Leg Piece, 10-15 cm from the Long Straight Edge.
From the top of the Long Straight Edge, mark the length ab. This is where the Seat Patch will be connected to the leg.
Measure the length bc along the Long Straight Edge. This will be the Leg Seam.
Draw in the left-hand side of the lower leg. Make the line straight between the Ankle and Knee lines, then curve it to meet the bottom of the short line at f (don't worry that this isn't exactly the same as the line on the diagram).
Now measure the length of the curved line cf on the left-hand lower leg. This will probably be shorter than the length bc on the Long Straight Edge. So you need to move point f to a new point b, which can be found by adjusting the curved line until the curved and straight Leg Seam edges are the same length.
The diagram shows line bg, which has been found by:
It should be possible to balance these adjustments so that each one is a relatively small change.
You may find it helpful to mark the desired length bc on a leather thong or piece of string. Place this on your pattern and move it around until it looks like the curved line bc in the diagram. Then draw along it.
Mark the points g and g' on the Seat Panel, by measuring the distance bg inwards from the two ends of the bottom edge. Measure the distance gg' on the bottom of the Seat Panel:
gg' = .........
Ideally, gg' would be H / 12, but it is likely to be a little longer.
Extend the bottom of the Front Piece to be gg' in length and draw in new angled sides eg and e'g'. Mark in the points d and d' by measuring WF (5 cm) down from e and e'. Measure the length gd.
gd = .........
Now draw in the curved line on the leg piece, which should be of the same length, gd. If this won't fit in sensibly, you can adjust the top width of the Front Piece, ee', and the top of the leg, da. The Front Piece should end up narrower at the top than the bottom.
Cut out your pattern pieces, and use them to cut your fabric.
*** ADD 1.5 CM SEAM ALLOWANCE AROUND ALL EDGES ***
It's also worth making some of the pieces oversized to allow for adjustment:
Cut the following pieces:
Now put the pieces together:
Make adjustments if necessary so that all pieces fit together correctly. Check that the opening at the top is the desired length H so that they will just go on over your hips.
Sew the trial trousers up and try them on. If they fit perfectly, mark with pen where you have sewn and then take them apart so you can use them to update your paper pattern (or you can just cut around the trial trouser pieces, remembering to include seam allowance). Otherwise, unpick seams and adjust as necessary.
Cut your trouser pieces out of your good quality cloth. If the cloth has a right side and a wrong side, remember to make THE LEFT LEG A MIRROR IMAGE OF THE RIGHT LEG.
Sew the trouser pieces together in the same order that you pinned the trial trouser pieces, adding the waistband last.
The waistband should be sewn so that the right side of the waistband is on the inside of the trousers. First, on the wrong side of the trousers (what will be the inside when the trousers are worn) fold the Front Piece seam allowance outwards as in the diagram:
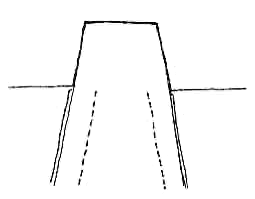
Figure 7: front of trousers
Now sew the waistband on to the trousers on the wrong side of the trousers, and then fold the waistband seam allowances over:
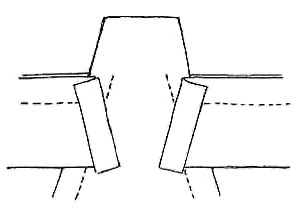
Figure 8: attaching the waistband
Fold the waistband up and sew the ends of the waistband onto the Front Piece using hemming stitch.
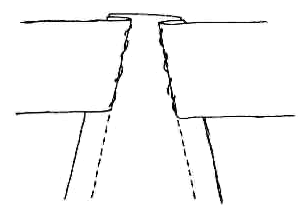
Figure 9: waistband and front piece
Now turn the trousers so that you are looking at the wrong side of the waistband, on the right side of the trousers. Fold the top edge over twice to the wrong side of the waistband, and sew down with hemming stitch.
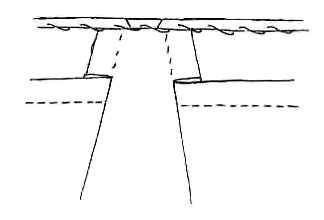
Figure 10: finishing the waistband
Hem the bottom edges of the legs, to the inside, in the usual way.
Cut 6 rectangles for belt loops, 1.5 cm in width and 8 cm in height. Sew them on to the outside of the waistband. Fold the waistband over when wearing the trousers, so that the right side of the waistband is on the outside of the trousers.

Figure 11: belt loops